How to Use a Potentiometer with Arduino (Uno, Mega, Nano): Using a Soft Potentiometer as a Practical Example
Author: David Marriott, Spectra Symbol CEO
Potentiometers remain one of the most common input devices in Arduino projects—and for good reason. They’re simple, reliable, and require minimal code to integrate. Whether you’re adjusting LED brightness, controlling servo positions, or building custom user interfaces, understanding how to properly wire and read a potentiometer is foundational Arduino knowledge.
This guide uses membrane potentiometers—specifically SoftPots from Spectra Symbol—as a practical example, but the electrical principles apply to all analog potentiometers. While membrane potentiometers behave identically in circuit theory, they introduce mechanical and electrical edge cases that make them especially useful teaching tools. We’ll cover wiring, signal behavior, code implementation, and integration strategies across Arduino Uno, Mega, and Nano platforms.
1. What a Potentiometer Does in an Arduino Circuit
A potentiometer functions as a variable voltage divider. When its outer terminals are connected to a voltage source (typically 5V on Arduino boards) and ground, the center terminal—called the wiper pin—produces a voltage proportional to position.
Arduino does not measure resistance directly. Instead, it samples the wiper voltage using its analog-to-digital converter (ADC). On Uno, Mega, and Nano boards, this ADC is 10-bit, converting an input voltage between 0V and the reference voltage (usually 5V) into an integer value from 0 to 1023.
Standard three-terminal wiring:
- Outer terminal 1: Voltage Source (e.g. +5 VDC)
- Center terminal (wiper): Analog input (e.g., A0)
- Outer terminal 2: GND
As the wiper moves, the resistance ratio between the two halves of the resistive element changes, shifting the output voltage accordingly. Arduino’s analog input documentation covers this conversion process in depth.
Links:
2. Standard Wiring (Arduino Uno First)
The Arduino Uno serves as the reference platform here. The Nano behaves identically, and the Mega uses the same approach for each analog channel.
2.1 Basic Wiring Diagram
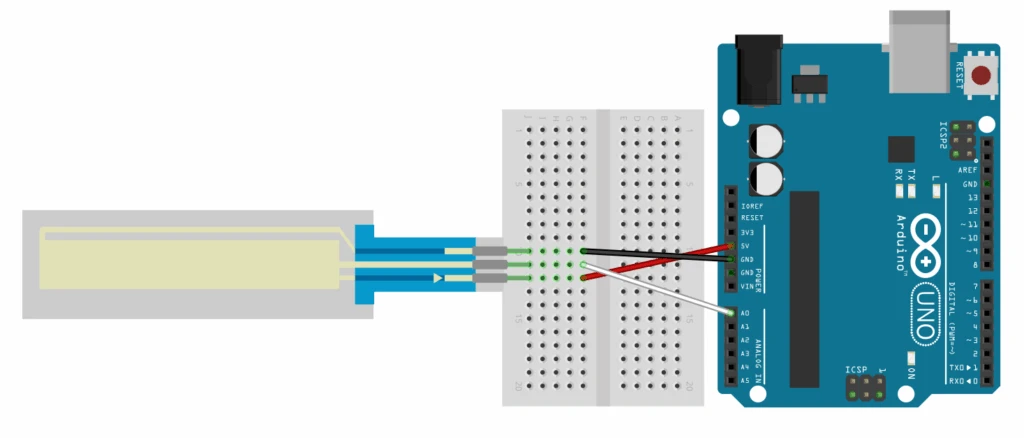
In practice:
- One outer pin → 5V
- Other outer pin → GND
- Wiper → A0
This wiring is valid for 3-pin rotary potentiometers and membrane potentiometers alike. The Uno provides 6 analog inputs (A0–A5), the Nano provides 8 (A0–A7), and the Mega provides 16 (A0–A15).
For SoftPots specifically, Spectra Symbol’s product documentation includes pin orientation and mechanical drawings that are worth reviewing before installation.
Links:
3. The Floating Pin Behavior of Membrane Potentiometers
Membrane potentiometers differ from rotary potentiometers in one important way: they only conduct when pressure is applied.
When a SoftPot is untouched, the wiper terminal is electrically floating—it is not connected to either rail. A floating analog pin behaves like a high-impedance antenna and will pick up environmental noise. The result is random or drifting ADC values, even when nothing is touching the sensor.
This behavior is expected and not a defect.
3.1 Pull-Down Resistor Solution
To stabilize the signal, add a pull-down resistor between the wiper and ground. Values between 100kΩ and 1MΩ are commonly used; these higher resistances minimize current draw while still providing reliable biasing in most applications.
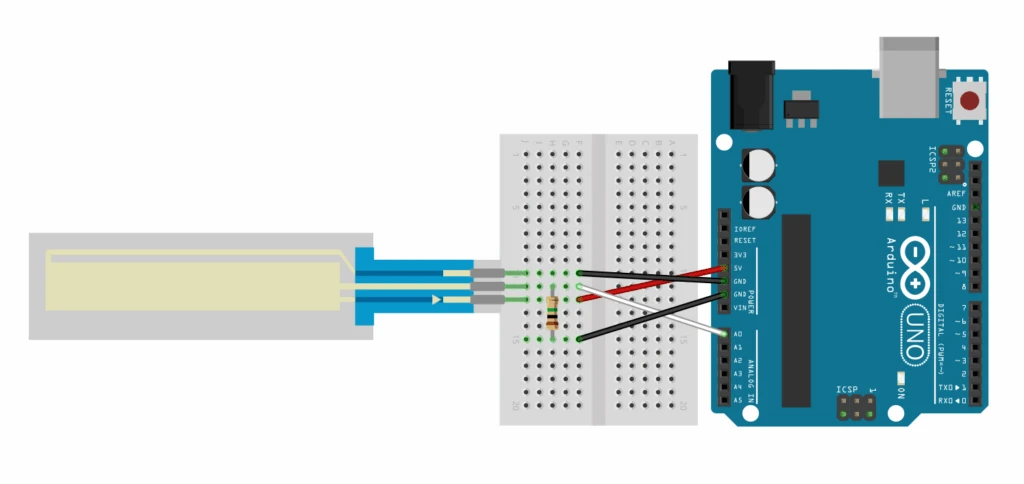
When untouched, the pull-down forces the wiper to 0V. When pressed, the much lower resistance path through the SoftPot dominates, and the Arduino reads position normally.
Arduino’s explanation of floating inputs (documented for digital pins but electrically applicable here) provides helpful background.
4. Reading the Signal in Code
4.1 Basic Read
C/C++
void setup() {
Serial.begin(9600);
}
void loop() {
int sensorValue = analogRead(A0);
Serial.println(sensorValue);
delay(100);
}
You should see values ranging from near 0 (unpressed or one extreme) to near 1023 (opposite extreme). analogRead() handles sampling and conversion automatically.
5. Mapping ADC Values to Useful Ranges
Raw ADC values rarely match actuator requirements directly.
LED Brightness Example
C/C++
int ledPin = 9;
void setup() {
pinMode(ledPin, OUTPUT);
}
void loop() {
int sensorValue = analogRead(A0);
int brightness = map(sensorValue, 0, 1023, 0, 255);
analogWrite(ledPin, brightness);
}
Servo Control Example
C/C++
#include <Servo.h>
Servo myServo;
void setup() {
myServo.attach(9);
}
void loop() {
int sensorValue = analogRead(A0);
int angle = map(sensorValue, 0, 1023, 0, 180);
myServo.write(angle);
delay(15);
}
The map() function preserves proportionality, which is exactly what potentiometers are good at.
6. Calibration for Real Installations
SoftPots rarely span the full theoretical ADC range in practice. Mounting constraints, enclosure geometry, and finger reach often limit usable travel.
Typical observed ranges might be 40–980, not 0–1023.
Measured calibration:
C/C++
int sensorMin = 50;
int sensorMax = 980;
void loop() {
int sensorValue = analogRead(A0);
sensorValue = constrain(sensorValue, sensorMin, sensorMax);
int output = map(sensorValue, sensorMin, sensorMax, 0, 255);
analogWrite(ledPin, output);
}
Calibration is especially important for:
- Long SoftPots (≥500 mm)
- Multi-unit consistency
- Enclosure-limited access
7. Signal Smoothing and Noise Control
ADC jitter is normal and comes from:
- EMI
- Pressure variation
- ADC quantization noise
An exponential moving average (EMA) is simple and effective:
C/C++
float smoothedValue = 0;
float alpha = 0.1;
void loop() {
int rawValue = analogRead(A0);
smoothedValue = (alpha * rawValue) + ((1 – alpha) * smoothedValue);
Serial.println(smoothedValue);
delay(10);
}
Lower alpha = smoother, slower response. Higher alpha = faster, noisier response.
Links:
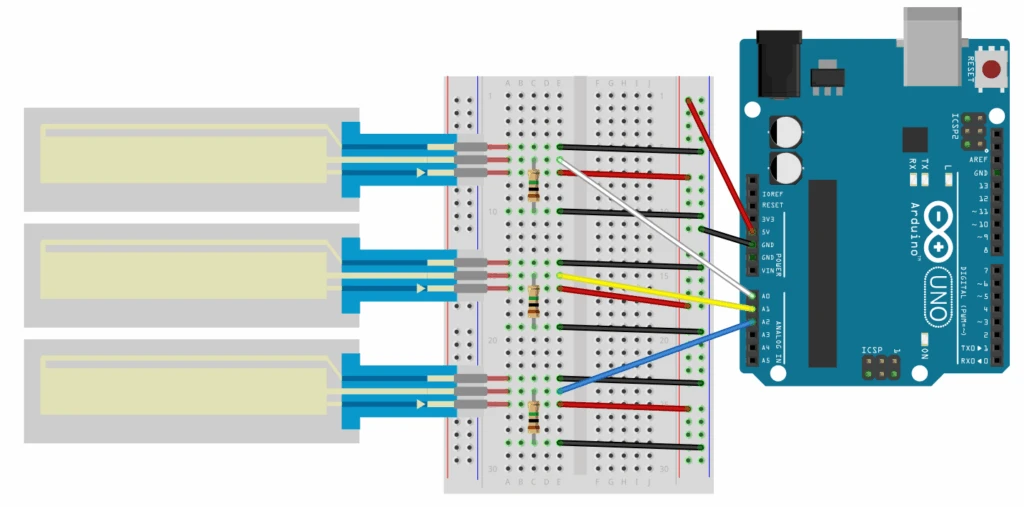
8. Multiple SoftPots (Arduino Mega Focus)
8.1 Multi-Channel Wiring
Each SoftPot gets:
- Its own analog pin
- Its own pull-down resistor
- Shared 5V and GND
Code example:
C/C++
void loop() {
int sensor1 = analogRead(A0);
int sensor2 = analogRead(A1);
int sensor3 = analogRead(A2);
// Process each independently
}
8.2 Why Mega Makes Sense
The Mega’s 16 analog inputs make it ideal for control panels, sliders, and musical interfaces. ADC resolution and reference behavior are identical to the Uno—you just gain pin count.
Links:
9. Mechanical Integration Considerations
SoftPots require rigid backing. Acrylic, polycarbonate, aluminum, or FR4 work well. Avoid compressible materials that introduce uneven pressure.
Installation guidance:
- Clean surface before adhesion
- Apply even pressure during mounting
- Strain-relieve the tail connector
- Avoid sharp tools or pointed styluses
Spectra Symbol application notes provide recommended pressure ranges and mounting best practices.
10. Environmental and Durability Notes
SoftPots are sealed membrane devices with no rotating shafts. Many models are rated up to IP65 in the active sensing area, though exact ratings depend on part number and installation.
Advantages over rotary potentiometers:
- No exposed wiper or shaft
- Reduced ingress risk
- Minimal mechanical wear points
This makes them suitable for:
- Dusty environments
- Sealed enclosures
- Medical and industrial prototypes
Always confirm ratings in the specific datasheet.
11. Power Protection (Optional but Sensible)
One design consideration when using potentiometers, especially membrane potentiometers, is the potential for short circuits. This is a very important consideration when using input power from a non-current-limited power supply. If there is not some sort of current-limiting feature designed in, there is a strong possibility that the potentiometer could short and burn out.
A good way to ensure that this does not occur is to place a small (~220Ω) resistor in series with the source voltage pin. This will ensure that the pot cannot short out and limit the available current to a range that the potentiometer can safely operate.
One impact of this design is that the “ceiling” or “max” voltage will be less than the supplied voltage due to the added protection resistor and you may need to modify your mapping and/or recalibrate for the new output range (see Sections 5 & 6).
12. Choosing Between Rotary Pots and SoftPots
Rotary potentiometers excel when:
- Continuous rotation is required
- Tactile feedback matters
- Panel mounting is desired
- Lowest cost is critical
SoftPots are better when:
- Space is limited
- Sealing matters
- Linear input is preferred
- Low-profile interfaces are required
They address the same electrical requirements with different mechanical constraints.
Conclusion
Potentiometers remain one of the simplest and most dependable Arduino inputs. Whether implemented as a rotary knob or a linear SoftPot, the underlying principle is the same: a voltage divider feeding the microcontroller’s ADC.
SoftPots follow these same rules while offering alternative mechanical tradeoffs—thin form factor, sealed construction, and flexible integration.
Reliable results come from:
- Correct wiring (including pull-downs for membrane types)
- Calibration to real-world limits
- Thoughtful mechanical mounting
Get those right, and potentiometers—of any form—become predictable, durable building blocks in Arduino systems.